
A Holiday Table to Remember

This DIY project I decided to try after flipping through Pinterest. Simply search “Birch Candles” and numerous photo boards will appear. After studying the photos, I figured this DIY project seemed fairly straight forward and, all in all, it was — all you need are two power tools, a few long birch logs and tealights.
Step by step instructions are listed below. The birch logs can be purchased from a local garden centre or grocery store. I bought three logs for $18 and they yielded 3 pillar gift sets for 5 friends.
To do this DIY, you’ll need the following tools:
- Mitre saw.
- Cordless drill with 1.5″ spade bit.
Step 1: Using the mitre saw, cut the log into the desired lengths. I prefer to have the pillars staggered in height and set in groups of 3 for visual appear and cut the logs into 7″, 5″ and 3″ lengths.


Step 2: With the fresh-cut side up, trace the outline of tealights on the surface to create a drilling template. Begin drilling.
You’ll need an extra pair of hands to hold the log steady while you drill.


To help drill to the correct depth, mark the drill bit with masking tape, to act as a depth guide.


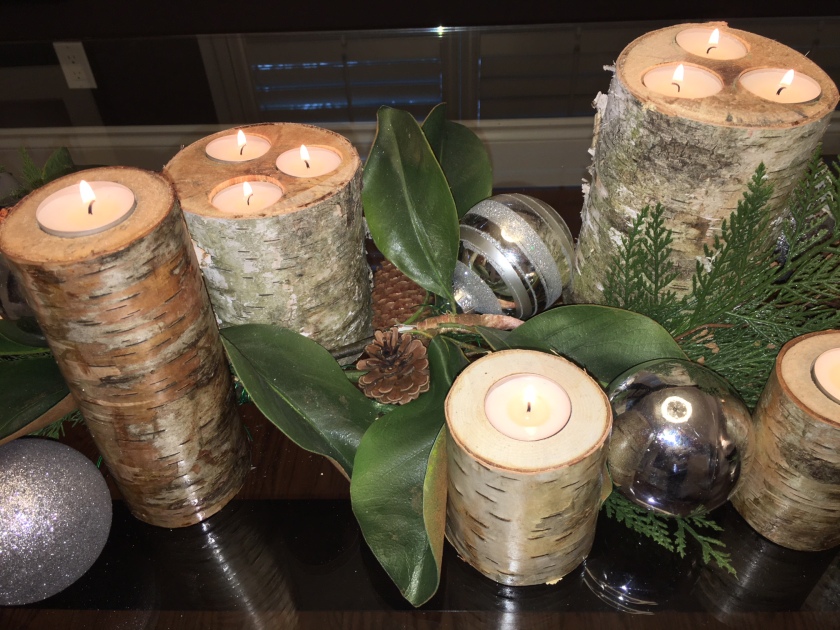
Step 3: Brush off wood shavings, insert tealights and let the magic begin!
I arranged the pillars along the middle of the dining table and then filled in the gaps with greenery purchased from a craft store (they are plastic) and added silver balls from the dollar store for a little extra sparkle. This entire centerpiece cost less than $15 and can be recreated year after year.

Spread the charm by using these pillars to decorate fireplace mantles, buffets and coffee tables too. They also blend well with Thanksgiving decor and will look great on the patio in summer lanterns. You can enjoy them all year long!
I hope you liked this DIY. One last thing…..
Never leave candles unattended.


Great idea thanks, I think I’ll try that in the summer. It will give my backyard table a new look during outside dinners. Did you put any type of seal on the wood to preserve it over time?
LikeLiked by 1 person
Hi Robecca, I’m sure they will look fantastic in your backyard. You raise a very good question about sealing these pillars. I did purchase a spray on shellac and lightly coated the pillars; however, I found that it left a shine on the bark that detracted from the natural look and feel of the wood, so I opted not to use the spray. The bark will continue to peel and split, and I find that makes them even nicer. Good luck with your summer project! I’m sure you’ll be thrilled with the results. I’ll see if I can take some photos of the pillars in a few summer lanterns to share. They really are so versatile and look great anywhere.
LikeLiked by 1 person
Love these birch pillars. Very rustic and natural looking. Perfect for the cottage mantel.
LikeLiked by 1 person
Thank you for commenting Wendy. Stay tuned for new DIYs.
LikeLiked by 1 person
I made a similar centerpiece a couple years ago and people always ask me how to do it. I usually list off the basic instructions from what I can remember, but now I can actually direct them to a spot for real instructions 🙂 the centerpiece is beautiful!
LikeLiked by 1 person
Vanessa, thanks for commenting. I hope your friends find the instructions easy to follow. I’m sure they will be creating beautiful centerpieces in no time.
LikeLiked by 1 person
What an amazing project!! I found the instructions step by step would be clear and concise to follow. The layout and pictures provided gave a realistic view of the finished product. I would definitely visit this blog again. It was very inviting and easy to read and I am looking forward to what the next project idea will be.
LikeLiked by 1 person
Beth, I’m so glad you liked my blog. Thank you for taking the time to share your comments. Please be sure to check back for new projects.
LikeLike
Wow, those candles look amazing it has such an natural feel to it. Using the birch pillar candles was really creative, awesome!
LikeLiked by 1 person
Bhavik, I’m glad you liked them. Stay tuned for other cool DIY projects.
LikeLiked by 2 people
Oooh, I love these , but don’t have the tools. Can you make me some??? LOL
LikeLiked by 1 person